
Chazie Baniquid
Technical Content Marketer
5 minutes to read
Stop Spam on Jotform Using Zapier and OOPSpam
Collecting form submissions through Jotform is a simple way to gather leads and feedback—but it also opens the door to spam. Unwanted entries from bots and fake users can disrupt your workflow, flood your inbox, and reduce the accuracy of your data.
To avoid this, you can use Zapier and OOPSpam to automatically filter out spam from Jotform submissions. In this blog, we’ll show you how to stop spam on Jotform using this integration, how each step works, and how to customize the setup to fit your needs.
How to Stop Spam on Jotform Using Zapier and OOPSpam
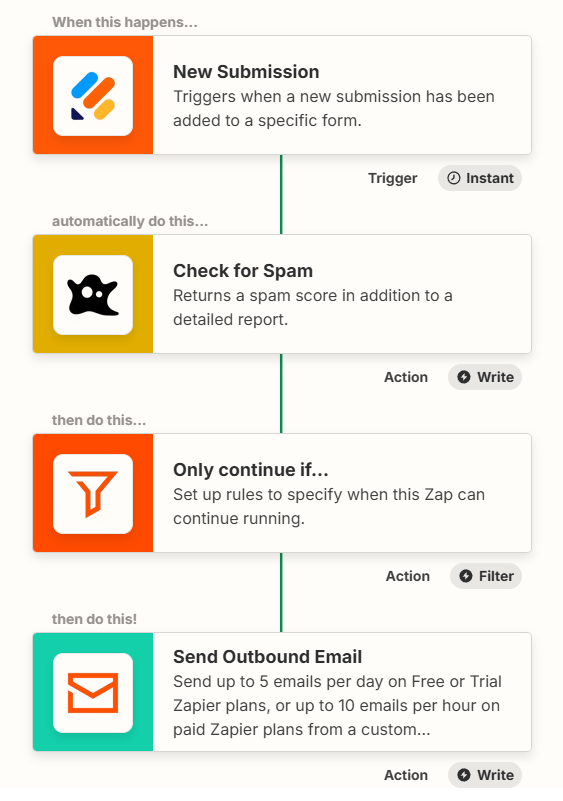
Below is a simple 5-step setup using Zapier. You can use the Zapier integration template here or build it manually.
To set up automated spam filtering for your Jotform submissions, you’ll need a Jotform account, an OOPSpam API key, and a Zapier (or Make.com) account. This setup will filter out spam before you receive notifications or store the data.
Step 1: Disable Default Email Notifications in Jotform
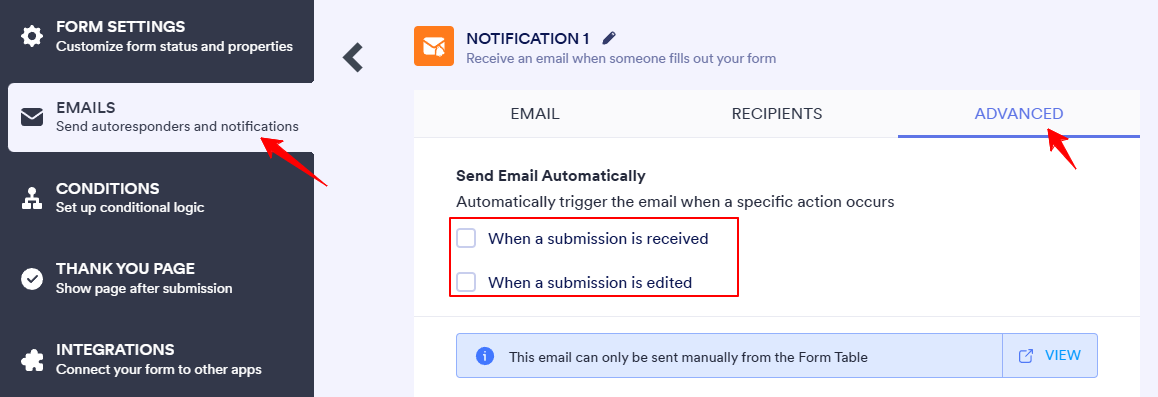
Before starting with Zapier, go to your Jotform settings and turn off the default email notifications for the form you’re working with. This avoids duplicate emails and gives Zapier full control over which submissions trigger actions.
Step 2: Create a Zap and Set the Trigger to “New Submission” in Jotform
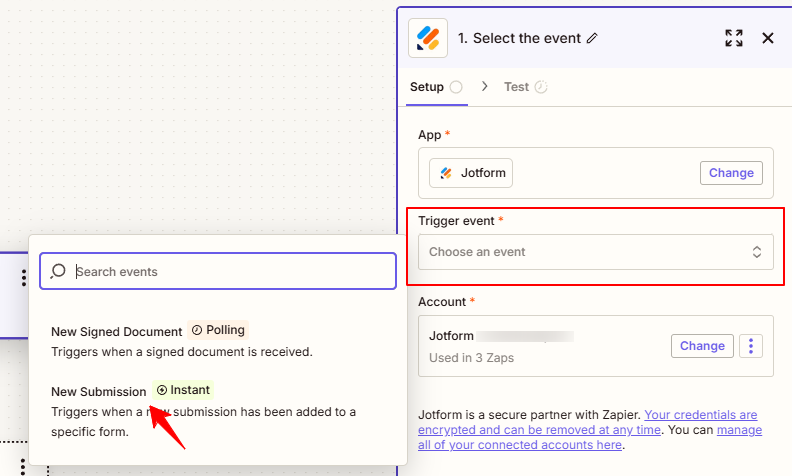
In Zapier, start by creating a new Zap.
- Choose Jotform as the trigger app.
- Set the trigger event to New Submission.
- Connect your Jotform account and select the form you want to monitor.
This will start the workflow each time a user submits your form.
Step 3: Add OOPSpam to Check for Spam
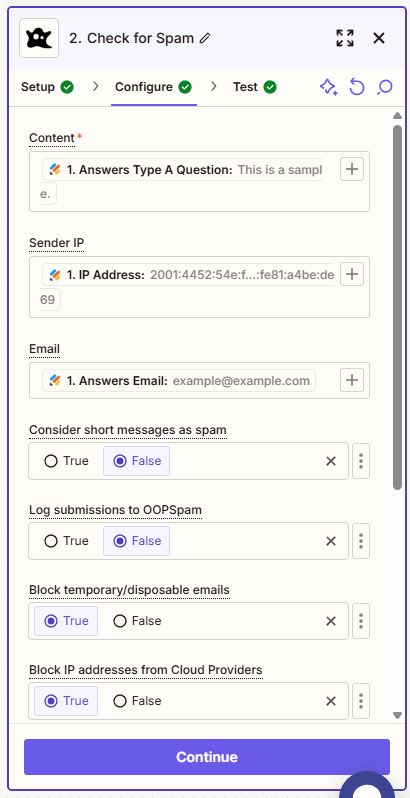
Add OOPSpam as the next step. Choose the action “Check for Spam.” You’ll need to map your Jotform fields (like email, name, content) into the OOPSpam fields. OOPSpam will return a spam score and other information.
Additional Settings You Can Configure
Below the basic fields, OOPSpam provides several additional options to help you fine-tune your spam filtering:
- Consider short messages as spam – Flags very short or generic messages.
- Log submissions to OOPSpam – Enable if you want to keep logs for analysis.
- Block temporary/disposable emails – Filters out emails from throwaway domains.
- Block IP addresses from Cloud Providers – Stops submissions from cloud-based bots.
- Block IP addresses from VPN Providers – Blocks entries sent through VPNs.
- Allow messages only in these languages – Accepts submissions only in selected languages.
- Allow entries only from these countries – Accepts submissions from specific countries.
Once these settings are configured to match your needs, click Continue to move on to the filter step.
Step 4: Filter the Results Based on Spam Score
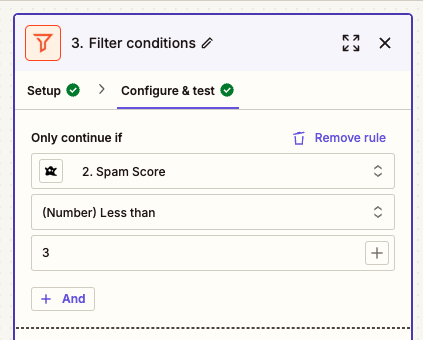
Use Zapier’s Filter step to decide whether the submission should continue. For example, you can set the filter to continue only if the spam score is less than 3. This stops spam submissions from going further in the workflow.
💡 Spam Score Threshold
For most use cases:
- Score 0–2 = Not spam
- Score 3–6 = Likely spam
You can adjust this threshold if needed, but this range works well in most setups. Review OOPSpam logs occasionally to fine-tune if necessary.
Step 5: Send a Notification or Store the Clean Submission
Once the form entry passes the spam filter, decide what to do with it:
- Send an email – Use Zapier Email, Gmail, or Outlook to notify yourself or your team.
- Store the data – Send clean submissions to a Google Sheet, CRM, Slack, or another app.
- Trigger another workflow – Add follow-up actions like tagging in a database or initiating onboarding.
Why Use This Integration?
This Jotform, Zapier, and OOPSpam setup works well because:
- No user friction – No captchas or puzzles for your visitors
- Low maintenance – Once set up, it runs in the background
- Customizable – Works with any Jotform and any follow-up action
- Better data – Fewer junk entries in your CRM or reports
Final thoughts
Setting up spam protection for Jotform doesn’t require complex code or manual review. With Zapier and OOPSpam, you can automate the process and ensure that only clean submissions make it through.
This saves time, protects your team, and keeps your data quality high. You can start with the Zapier template here or build your own flow step-by-step.
Need help building the workflow? Contact us—we’re happy to guide you through it!